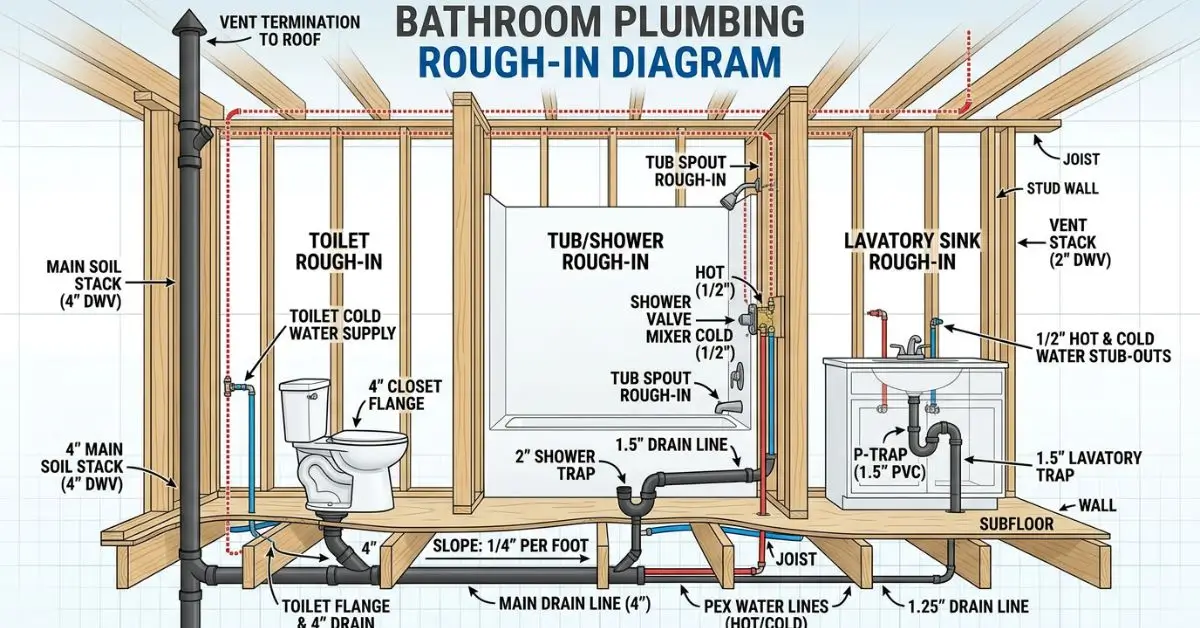
Bathroom Plumbing Rough In Diagram: A Complete Guide to Getting It Right
Planning a new bathroom or renovating an existing one is exciting until you realize the plumbing has to go in before anything else. Get the rough-in wrong, and you could end up with a toilet that doesn’t fit, a shower drain in the wrong spot, or supply lines that don’t line up with your fixtures.
These aren’t small problems. Fixing rough-in plumbing mistakes after walls are closed and tiles are laid is expensive, disruptive, and completely avoidable with the right information upfront.
This guide explains exactly what a bathroom plumbing rough-in diagram shows, what the standard measurements are for every main fixture, and what to check before your walls go up. Whether you’re working with a contractor or tackling this yourself, understanding these dimensions puts you in control.
What Is a Bathroom Plumbing Rough In Diagram?
A bathroom plumbing rough in diagram is a technical layout showing the exact position of all supply lines, drain pipes, and vent connections for bathroom fixtures — before walls, floors, and finishes are installed. It specifies the height and horizontal placement of water supply inlets, the centerline location of drains, and the rough-in distance from walls to fixture connection points. These measurements must be correct before any fixture is permanently set.
Quick Summary
- Rough-in plumbing is installed before walls and floors are finished
- Every fixture — toilet, sink, shower, tub — has specific standard measurements
- The most critical measurement for a toilet is the rough-in distance: typically 12 inches from the finished wall to the drain centerline
- Supply lines and drain heights must match your chosen fixtures before you order them
- Mistakes at the rough-in stage are costly to fix later — measure twice, always
Why the Rough-In Stage Is the Most Important Part of Bathroom Plumbing
Most people think the rough-in is just “the pipes in the wall.” It’s much more than that.
The rough-in stage sets the exact position of every drain and supply connection in your bathroom. Once concrete is poured, subfloor is laid, or walls are closed, those positions are locked in. If a drain is two inches off-center, your toilet won’t sit flush against the wall. If a supply line is too high or too low, your faucet won’t connect properly.
A contractor in Phoenix, Arizona learned this the hard way. After tiling a full bathroom, they discovered the toilet flange had been set at 10 inches from the finished wall instead of 12. The toilet they purchased didn’t fit. The tile had to be cut, the flange repositioned, and two days of work redone — all because one measurement was wrong at the rough-in stage.
Getting a bathroom plumbing rough-in diagram right the first time saves time, money, and real frustration.
What a Rough-In Diagram Actually Shows
A rough-in diagram is essentially a map of your bathroom plumbing from above (floor plan view) and from the side (elevation view). It shows:
- Drain locations — where each fixture’s drain pipe exits through the floor or wall, with centerline measurements from reference walls
- Supply line locations — where hot and cold water lines come out of the wall or floor, with height measurements from the finished floor
- Vent stack connections — where each drain connects to the vent system to allow proper drainage
- Fixture footprint — the space each fixture occupies and the clearances needed around it
You don’t need to be an engineer to read one. Once you understand what each measurement refers to, it’s straightforward.
Standard Rough-In Measurements by Fixture
This is where most people need the clearest guidance. Here are the standard rough-in dimensions for each main bathroom fixture.
Toilet Rough-In
The toilet is the most measurement-sensitive fixture in the bathroom. The most important number is the rough-in distance — the measurement from the finished wall behind the toilet to the center of the drain (flange).
Standard toilet rough-in distance: 12 inches
Some older homes use 10-inch or 14-inch rough-ins. Always measure your existing rough-in before purchasing a replacement toilet — not all toilets fit all rough-in sizes.
Other toilet rough-in measurements:
- Side clearance: Minimum 15 inches from the toilet centerline to any side wall or obstruction (18 inches is more comfortable and often required by code)
- Front clearance: Minimum 21 inches of clear space in front of the toilet (24–30 inches preferred)
- Supply line height: Cold water supply stub-out should be 6–8 inches above the finished floor, positioned 6 inches to the left of the toilet drain centerline
Bathroom Sink (Vanity) Rough-In
Sink rough-in measurements depend on whether you’re installing a wall-hung sink, a pedestal sink, or a vanity cabinet sink.
Standard sink drain rough-in:
- Drain centerline: 16–20 inches from the finished floor (for most standard vanity heights)
- Drain rough-in from side wall: based on your vanity width — typically centered on the vanity
Supply line rough-in:
- Hot and cold supply lines: 21 inches above the finished floor (standard for most faucets)
- Spacing between hot and cold stubs: 8 inches apart (4 inches left and right of drain centerline)
- Hot water supply is always on the left, cold on the right — this is a universal plumbing standard
Shower Rough-In
Shower rough-in involves the drain, the supply valve, and the showerhead outlet.
Shower drain:
- Centered within the shower floor footprint
- Standard shower floor drain: 2-inch drain pipe minimum (3-inch preferred for better flow)
Shower valve rough-in:
- Valve centerline height: 48 inches above the finished floor (standard for most thermostatic and pressure-balance valves)
- Some prefer 38–42 inches for lower, more accessible placement
Showerhead outlet:
- Standard height: 72–80 inches above the finished floor
- Centered horizontally on the shower wall
Body spray outlets (if included): positioned at various heights per design preference, but planned before walls are closed.
Bathtub Rough-In
Bathtubs are set into position before walls are finished, so all rough-in connections must be placed accurately first.
Tub drain:
- Located at the foot end of the tub, typically 4 inches from the end wall
- Drain centerline is usually 16 inches from the side wall (for a standard alcove tub)
Tub supply and faucet:
- Faucet valve centerline: 28–30 inches above the finished floor (for a standard tub/shower combo)
- Hot and cold supply stubs: 8 inches apart, centered on the faucet valve location
- Tub spout height: approximately 4 inches above the tub deck (or per manufacturer specs)
Standard Rough-In Measurement Reference Table
| Fixture | Measurement | Standard Dimension |
|---|---|---|
| Toilet | Rough-in distance (wall to drain center) | 12 inches (10″ or 14″ in older homes) |
| Toilet | Side wall clearance (centerline to wall) | 15″ min / 18″ preferred |
| Toilet | Supply line height | 6–8 inches above floor |
| Sink | Drain height from floor | 16–20 inches |
| Sink | Supply line height | 21 inches above floor |
| Sink | Hot/cold supply spacing | 8 inches apart |
| Shower | Valve centerline height | 48 inches above floor |
| Shower | Showerhead height | 72–80 inches above floor |
| Shower | Drain pipe size | 2 inch minimum |
| Bathtub | Faucet valve height | 28–30 inches above floor |
| Bathtub | Tub spout height | 4 inches above tub deck |
Understanding Drain, Waste, and Vent (DWV) in a Rough-In
The supply lines are only half the picture. The drain, waste, and vent (DWV) system is equally important — and more complex.
Every drain needs a trap. The P-trap holds water to block sewer gases from entering the bathroom. The trap must be within a specific distance of the vent stack — typically no more than 5 feet for a 1.5-inch drain pipe.
Every fixture needs venting. Without proper venting, drains gurgle, flow slowly, and allow sewer gas into the room. Vents run up through the wall and exit through the roof. They must be connected before walls are closed.
Pipe slope matters. Drain pipes must slope correctly — typically ¼ inch of drop per foot of horizontal run. Too little slope and waste sits in the pipe. Too much slope and water runs ahead of solids, leaving buildup behind.
If any of these three elements — trap, vent, slope — are wrong in a rough-in, the drainage system won’t work properly no matter how good the fixtures are.
How to Read and Use a Bathroom Plumbing Rough-In Diagram
If you’re working from a diagram provided by a fixture manufacturer or drawn by your plumber, here’s how to use it practically:
Step 1 — Identify your reference walls.
All measurements in a rough-in diagram reference specific walls — usually the back wall (behind the toilet) and the side wall. Mark these clearly on your subfloor before laying out pipe positions.
Step 2 — Mark all drain centerlines on the subfloor.
Use a chalk line or pencil to mark exactly where each drain center will be. Double-check every measurement before cutting into the subfloor.
Step 3 — Confirm fixture specs match your rough-in.
Before ordering fixtures, compare their spec sheets to your rough-in measurements. A toilet listed as “12-inch rough-in” must match a 12-inch rough-in exactly. Sink faucet hole spacing must match supply line spacing.
Step 4 — Check clearances.
Confirm that every fixture has the required clearance on all sides — especially the toilet. Code minimums exist for a reason, but comfort clearances are worth planning for.
Step 5 — Have the rough-in inspected.
In most US states, rough-in plumbing must pass a building inspection before walls are closed. This is not optional — and it’s actually useful. An inspector will catch problems before they’re hidden behind drywall.
Common Rough-In Mistakes and How to Avoid Them
Even experienced contractors make rough-in errors. The most common ones are:
Wrong toilet rough-in distance. Buying a toilet before measuring the existing or planned rough-in. Always measure first, buy second.
Supply lines at the wrong height. Installing supply stubs too low or too high for the faucet being used. Check the faucet’s spec sheet before setting stub heights.
Forgetting the finished floor thickness. Rough-in measurements are taken from the finished floor — not the subfloor. If you’re adding tile, account for the thickness. A ¾-inch tile adds ¾ inch to every height measurement.
No cleanout access. Drain pipes should have cleanout plugs installed at accessible points. Skipping this means future blockages require cutting into walls.
Incorrect vent pipe sizing. Using undersized vent pipes restricts airflow and causes slow drains and gurgling. Follow local code requirements for vent pipe diameter.
When to Hire a Licensed Plumber for Rough-In Work
Rough-in plumbing is one area where DIY has real limits — not because the concepts are complicated, but because the consequences of mistakes are expensive and sometimes code violations.
Hire a licensed plumber if:
- You’re breaking into an existing concrete slab to move drain locations
- The bathroom is being added to the house (not just renovated)
- You need to connect to the main soil stack or main water supply line
- Your local building code requires licensed plumbing for rough-in work (many US jurisdictions do)
- You’re unsure about venting requirements
For straightforward renovations where drain locations aren’t moving, a skilled DIYer can handle much of the rough-in work — but always pull the required permits and schedule the inspection.
Conclusion
A bathroom plumbing rough-in diagram is the foundation everything else is built on. Get these measurements right and the rest of the bathroom build goes smoothly. Get them wrong and you’re looking at costly fixes after the fact.
The key is to measure carefully, cross-check every fixture’s spec sheet against your rough-in dimensions, and never assume the finished floor is the same as the subfloor. When in doubt — especially for drain relocation or new bathroom additions — a licensed plumber is worth every dollar.
Plan well at this stage and the rest of your bathroom project becomes significantly easier.
Frequently Asked Questions
What is the standard toilet rough-in size?
In the US, the standard is 12 inches — from the finished wall to the center of the drain flange. Older homes may use 10-inch or 14-inch rough-ins. Always measure before buying a replacement toilet, as sizes aren’t universal.
What does rough-in mean in plumbing?
Rough-in is the first stage of plumbing installation — supply pipes, drain pipes, and vent connections are all put in place before walls and floors are finished. Nothing is visible at this stage. It sets the exact position of every plumbing connection in the room.
How do I measure bathroom rough-in dimensions myself?
Always measure from the finished wall and finished floor — not the stud or subfloor. Use a level and chalk lines to mark drain centerlines. If you’re adding tile, account for its thickness in every height measurement before setting pipe positions.
Do rough-in measurements include tile thickness?
Yes, all rough-in measurements are based on finished surfaces, not bare subfloor or wall. Adding ¾-inch tile raises the floor level by ¾ inch. Forgetting this is one of the most common rough-in mistakes — it throws off supply line heights and drain positions.
Can I move a toilet drain during a bathroom renovation?
Yes, but the difficulty depends on your floor type. Timber floors are manageable. Concrete slabs require breaking up the floor — a bigger job. Either way, the drain must slope correctly and be properly vented. A licensed plumber is strongly recommended.