Bathroom Plumbing Diagram for Rough In
If you’re building a new bathroom or doing a full renovation, the rough-in stage is where everything is decided. Every drain location, every supply line position, every pipe height — all of it gets locked in before a single tile goes down or a wall gets closed.
Get these measurements right and the rest of the project runs smoothly. Get them wrong and you’re looking at broken tiles, misaligned fixtures, and expensive corrections after the fact.
The problem is that most people — even experienced contractors — don’t always take the time to fully understand what a bathroom plumbing diagram for rough in actually shows. They assume they know, make a small error, and end up with a toilet that sits two inches from the wall or a faucet that doesn’t line up with the valve behind it.
This guide walks through everything clearly. You’ll learn what a rough-in diagram contains, what each measurement refers to, the standard dimensions for every main bathroom fixture, and the most common mistakes that cause problems on real projects.
What Is a Bathroom Plumbing Diagram for Rough In?
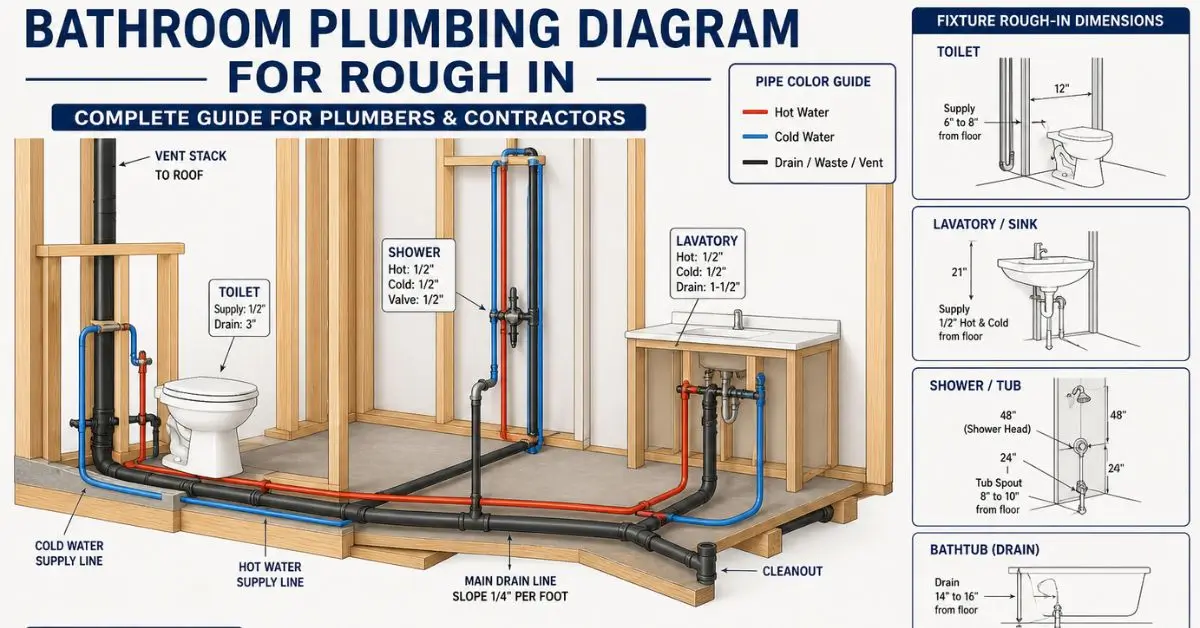
A bathroom plumbing diagram for rough in is a technical layout that shows the exact position of all drain pipes, supply lines, and vent connections for bathroom fixtures — mapped out before walls, floors, and finishes are installed. It specifies drain centerline locations, supply stub-out heights, pipe diameters, and fixture clearances. Every measurement on a rough-in diagram references the finished wall and finished floor surface — not the raw subfloor or stud wall.
Quick Summary
- A rough-in diagram maps the exact position of every pipe connection before finishes go in
- All measurements reference finished surfaces — not subfloor or bare studs
- The standard toilet rough-in distance is 12 inches from the finished wall to the drain center
- Supply lines for sinks are typically set at 21 inches above the finished floor, 8 inches apart
- DWV (drain, waste, vent) layout must be planned alongside supply lines — not as an afterthought
- Mistakes at rough-in stage are expensive to fix after walls are closed
Why the Rough-In Diagram Is the Foundation of Every Bathroom Build
Most people think the rough-in is just a preliminary step — something to get through before the real work begins. That’s exactly backwards.
The rough-in diagram determines where every fixture sits, whether the toilet fits against the wall, whether the shower valve lines up with the handle, and whether the sink drain connects cleanly to the waste pipe. Every decision made later in the project — tile layout, vanity selection, shower size — is built on top of what the rough-in diagram establishes.
A contractor in Denver, Colorado tiled a full bathroom before realizing the toilet flange had been set at 10 inches from the finished wall instead of the standard 12. The toilet they’d purchased didn’t fit. Two days of tile work had to be removed, the flange repositioned, and the floor re-tiled. The rough-in error cost $1,800 to correct — all from one wrong measurement.
That’s why understanding the bathroom plumbing diagram for rough in matters so much — before any work begins.
What a Rough-In Diagram Actually Shows
A complete bathroom rough-in diagram typically includes two views:
Floor plan view (top-down): Shows where each fixture sits in the room, with drain centerline positions measured from reference walls. This is where you confirm toilet placement, shower footprint, and sink position relative to side walls.
Elevation view (side view): Shows the height of supply line stub-outs and valve positions above the finished floor. This is where faucet connection heights, shower valve positions, and showerhead heights are confirmed.
Together, these two views give a complete picture of where every pipe needs to be — both horizontally across the floor and vertically up the wall.
Reading the Diagram: Key Measurements Explained
Reference Points — Finished Floor and Finished Wall
This is the single most important thing to understand about any rough-in diagram.
Every measurement references the finished surface — the completed floor after tile or vinyl is laid, and the completed wall after drywall and tile are installed. Not the subfloor. Not the wall stud.
If you’re adding 3/4-inch ceramic tile to the floor, your finished floor is 3/4 inch higher than the subfloor. Every height measurement — supply line stubs, drain heights, valve centers — must account for that added thickness.
Forgetting this is one of the most common rough-in errors on real projects.
Toilet Rough-In Measurements
The toilet is the most measurement-critical fixture in the bathroom.
Rough-in distance: The most important measurement — the horizontal distance from the finished wall behind the toilet to the center of the toilet drain (the flange). Standard is 12 inches. Some older homes use 10-inch or 14-inch rough-ins.
Always confirm your rough-in distance before purchasing a toilet. A 12-inch toilet will not work in a 10-inch rough-in space.
Side wall clearance: The toilet centerline must be at least 15 inches from any side wall or obstruction. Most building codes and comfort standards recommend 18 inches or more.
Front clearance: A minimum of 21 inches of clear floor space in front of the toilet is required by most US codes. 30 inches is recommended for comfortable use.
Cold water supply stub-out:
- Height: 6 to 8 inches above the finished floor
- Position: 6 inches to the left of the toilet drain centerline
Sink and Vanity Rough-In Measurements
Sink rough-in dimensions vary depending on whether you’re installing a wall-hung sink, pedestal sink, or vanity cabinet.
Drain position:
- Drain centerline height: 16 to 20 inches above the finished floor (for standard vanity height)
- Horizontal position: centered on the vanity or sink basin
Supply line stub-outs:
- Height: 21 inches above the finished floor (standard for most faucets)
- Spacing: 8 inches apart — 4 inches left and 4 inches right of the drain centerline
- Hot water is always on the left, cold on the right — this is a universal plumbing standard
Shower Rough-In Measurements
Shower rough-in involves three separate elements — the drain, the valve, and the showerhead outlet.
Shower drain:
- Centered within the shower floor footprint
- Minimum drain pipe size: 2 inches (3-inch preferred for better flow)
- The drain must connect to the waste line with the correct slope — 1/4 inch drop per foot of horizontal run
Shower valve (pressure-balance or thermostatic):
- Standard centerline height: 48 inches above the finished floor
- Some designs use 38 to 42 inches for lower, more accessible placement
Showerhead outlet:
- Standard height: 72 to 80 inches above the finished floor
- Centered horizontally on the shower wall
Bathtub Rough-In Measurements
The bathtub is set into position before surrounding walls are finished, so all rough-in connections must be in place first.
Tub drain:
- Located at the foot end of the tub
- Drain centerline typically 16 inches from the side wall (standard alcove tub)
Faucet and supply lines:
- Valve centerline height: 28 to 30 inches above the finished floor (tub/shower combo)
- Supply stubs: 8 inches apart, centered on the faucet valve location
- Tub spout: approximately 4 inches above the tub deck
Standard Rough-In Measurement Reference Table
| Fixture | Measurement | Standard Dimension |
|---|---|---|
| Toilet | Wall to drain centerline (rough-in distance) | 12 inches (10″ or 14″ in older homes) |
| Toilet | Side wall clearance (centerline to wall) | 15″ min / 18″ preferred |
| Toilet | Cold supply height | 6–8 inches above finished floor |
| Sink | Drain height | 16–20 inches above finished floor |
| Sink | Supply line height | 21 inches above finished floor |
| Sink | Hot/cold supply spacing | 8 inches apart |
| Shower | Valve centerline height | 48 inches above finished floor |
| Shower | Showerhead height | 72–80 inches above finished floor |
| Shower | Drain pipe size | 2 inch minimum |
| Bathtub | Faucet valve height | 28–30 inches above finished floor |
| Bathtub | Tub spout height | ~4 inches above tub deck |
The DWV System — Drain, Waste, and Vent
Supply lines are only half the picture. The drain, waste, and vent system — DWV — must be planned alongside supply lines on every bathroom plumbing diagram for rough in.
Every drain needs a trap. The P-trap holds water to block sewer gases from rising through the pipe into the room. The trap must be positioned within a specific distance from the vent stack — no more than 5 feet for a 1.5-inch drain pipe under most US codes.
Every fixture needs venting. Without proper venting, drains gurgle, flow slowly, and siphon water out of traps — which allows sewer gases to enter the bathroom. Vent pipes must be connected at the rough-in stage, before walls are closed.
Drain slope is critical. Horizontal drain pipes must slope consistently — 1/4 inch of drop for every foot of horizontal run. Too little and waste sits in the pipe. Too much and water runs ahead of solids, leaving buildup behind.
If any of these three elements are wrong in the rough-in, the drainage system won’t work correctly no matter how well everything else is installed.
How to Use a Rough-In Diagram on a Real Project
Understanding the diagram is one thing. Using it correctly on site is another.
Step 1 — Identify your reference walls.
Mark clearly which wall is the “back wall” (behind the toilet) and which is the “side wall.” All horizontal measurements start from these references.
Step 2 — Mark all drain centerlines on the subfloor.
Use a chalk line or pencil to mark exact drain positions on the subfloor — accounting for the finished floor thickness above it.
Step 3 — Set supply stub-out heights.
Calculate all supply line heights from the finished floor level — again accounting for tile or flooring thickness before framing in stub-out positions.
Step 4 — Cross-check fixture specifications.
Before ordering any fixture, compare the manufacturer’s spec sheet to your rough-in dimensions. Toilet rough-in distance, faucet hole spacing, and shower valve trim plate sizes must all match your planned rough-in positions.
Step 5 — Get the rough-in inspected.
In most US jurisdictions, rough-in plumbing must pass a building inspection before walls are closed. This is legally required — and genuinely useful. An inspector will catch positioning errors before they’re hidden behind tile and drywall.
Common Rough-In Mistakes — and How to Avoid Them
Measuring from the subfloor instead of the finished floor. This shifts every height measurement — sometimes by 3/4 inch or more. Always calculate from where the finished floor will be.
Buying fixtures before confirming rough-in dimensions. Always measure first, purchase second. A toilet purchased for a 12-inch rough-in won’t fit a 10-inch rough-in — and returning a toilet is complicated.
Skipping the vent connections. Rough-in diagrams sometimes show drains clearly but vents are left as an afterthought. Every fixture needs a vent — plan it in at the rough-in stage.
No cleanout access. Install cleanout plugs at accessible points in the drain line. Skipping them means future blockages require cutting into finished walls.
Incorrect pipe slope. Check drain slope with a level at every horizontal run. A 4-foot level makes this quick and accurate.
When to Call a Licensed Plumber
A careful DIYer can handle much of the rough-in process on a straightforward bathroom renovation — but there are situations where a licensed plumber is the right call.
Call a professional if:
- You’re breaking into a concrete slab to move drain locations
- You’re adding a completely new bathroom to the house
- The main soil stack or main water supply line needs to be modified
- Your local code requires licensed plumbing for rough-in work (many US jurisdictions do)
- You’re unsure about venting requirements or pipe sizing
Permits and inspections exist for good reason — they protect you from problems that show up years later and are expensive to fix.
Conclusion
A bathroom plumbing diagram for rough in is the blueprint that everything else is built on. Get these measurements right — especially the finished floor reference, the toilet rough-in distance, and the DWV connections — and the rest of the bathroom project falls into place cleanly.
The details matter here more than almost anywhere else in a build. A small error at the rough-in stage creates a large, expensive problem once finishes are in. Take the time to measure carefully, cross-check fixture specifications, and have the work inspected before closing walls.
Do that, and the rest of the project becomes significantly easier.
Frequently Asked Questions
What is the standard toilet rough-in measurement?
In the US, the standard is 12 inches — from the finished wall to the center of the drain flange. Older homes may use 10-inch or 14-inch rough-ins. Always measure before buying a toilet — sizes are not interchangeable.
Do rough-in measurements include tile thickness?
Yes — all measurements reference the finished floor and finished wall, not the subfloor or bare stud. If you’re adding 3/4-inch tile, every height measurement must account for that extra thickness. Forgetting this is one of the most common rough-in mistakes.
What is the correct height for bathroom sink supply lines?
Set supply lines at 21 inches above the finished floor, spaced 8 inches apart — 4 inches each side of the drain centerline. Hot is always left, cold is always right. Cross-check with your faucet’s spec sheet before finalizing positions.
How do I read a bathroom plumbing diagram for rough in if I’m not a plumber?
Start with two reference points — the finished wall and finished floor. All measurements work outward from there. Map drain centerlines first, then supply line heights. Always match measurements to your fixture’s spec sheet before marking anything on site.
What pipe size is used for bathroom rough-in drains?
Toilets need 3-inch pipe minimum. Sinks use 1.5-inch. Showers need 2-inch minimum, 3-inch preferred. Bathtubs use 1.5 to 2-inch pipe. Vent pipes range from 1.5 to 3 inches depending on fixtures and local code.
Can I move a toilet drain during a bathroom renovation?
Yes — but it depends on your floor type. Timber floors are manageable. Concrete slabs require breaking up the floor, which is a bigger job. Either way, the drain must slope correctly and be properly vented. Professional help is recommended for slab work.