Bathroom Plumbing Rough-In Diagram: A Complete Guide for Homeowners
Planning a bathroom renovation or building a new bathroom from scratch is exciting. But nothing brings a project to a sudden stop faster than getting your plumbing measurements wrong.
You order a toilet, it arrives, and then you realize the drain is in the wrong spot. Now you are looking at tearing up the floor or returning the fixture. That mistake costs time, money, and a lot of frustration.
That is exactly why understanding a bathroom plumbing rough-in diagram matters before you buy a single fixture or swing a single hammer.
In this guide, you will learn what a rough-in diagram is, how to read one correctly, what the standard measurements are for every fixture, and how to avoid the most common mistakes that homeowners and even some contractors make.
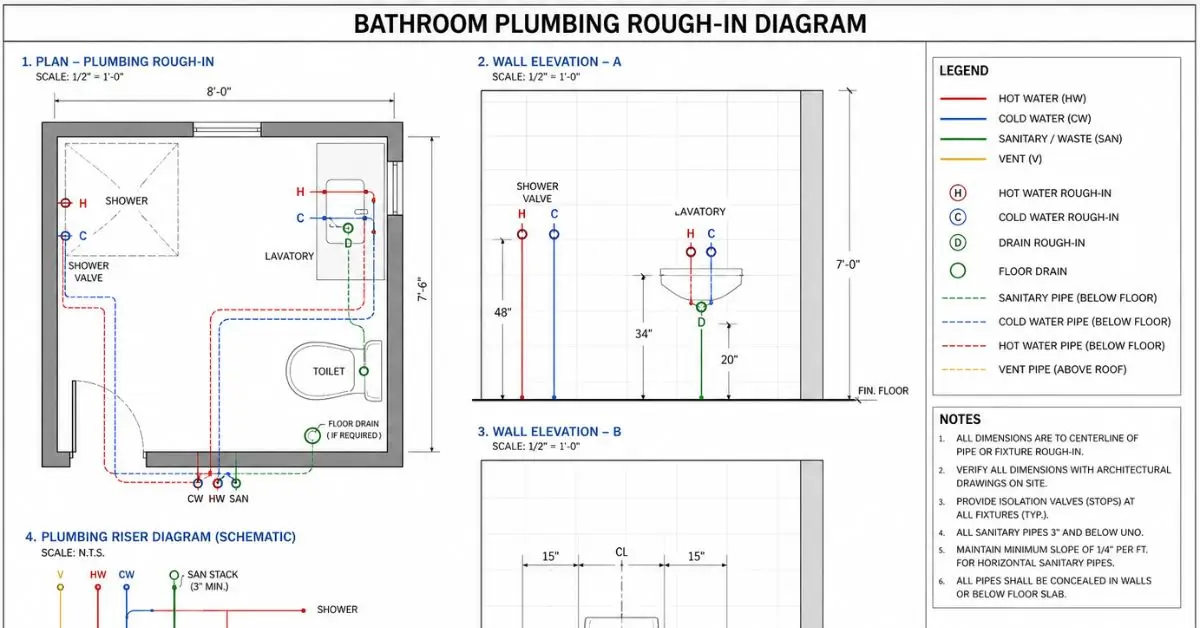
A bathroom plumbing rough-in diagram is a technical drawing that shows the exact location of water supply lines, drain pipes, and vent stacks before walls and floors are finished. It maps where every pipe needs to be positioned so that toilets, sinks, showers, and bathtubs connect properly once installation begins.
Quick Summary
A rough-in diagram shows where pipes go before walls close up. Getting these measurements right saves you from expensive fixes later. The most important number to know is your toilet rough-in distance, usually 12 inches from the finished wall to the drain center. Read this guide before buying any bathroom fixture.
What Is a Plumbing Rough-In, Exactly?
Before tiles go down and walls close up, plumbers install all the pipes that will eventually connect to your fixtures. This phase of construction is called the rough-in stage.
At this point, nothing is finished. You will see exposed pipes sticking out of the subfloor and walls. It looks rough because it is supposed to. The finishing work comes later.
A rough-in diagram is the map that guides this work. It shows the plumber exactly where every drain, supply line, and vent needs to land. If the diagram is wrong, or if the installer ignores it, every fixture attached to those pipes could end up misaligned.
Think of it like laying a foundation. If the foundation is off by a few inches, every wall built on top of it is also off. Plumbing works the same way.
Why the Rough-In Diagram Matters More Than Most People Realize
Most homeowners focus on the fun part of bathroom design. They pick tiles, fixtures, vanities, and faucets. The behind-the-wall work feels like a detail they can leave to the plumber.
That thinking causes real problems.
If you buy a toilet before confirming your rough-in measurement, you might end up with a fixture that simply does not fit. If you design a bathroom layout without checking where your drain stack runs, you could be looking at a full floor demo just to move a pipe a few inches.
A bathroom remodel in the US can easily run from $6,000 to $15,000 or more. A rough-in mistake discovered after walls are closed can add thousands to that cost.
Understanding the diagram helps you ask the right questions, catch problems early, and make sure every fixture you choose will actually work in your space.
Key Components Shown on a Bathroom Rough-In Diagram
A standard bathroom plumbing rough-in diagram will show several elements. Here is what to look for and what each one means.
Drain Lines
These are the pipes that carry wastewater away from your fixtures. Every fixture needs a drain, and each drain needs to be at the right location and the right depth. Drains shown on a rough-in diagram include the toilet flange, shower drain, bathtub drain, and sink drain.
Water Supply Lines
These are the pipes that bring hot and cold water to each fixture. The diagram shows where both hot and cold supply lines will stub out from the wall or floor. For a sink, you will typically see two supply line locations side by side. For a shower, the location determines where your faucet and showerhead will end up.
Vent Stack
Every drain in a properly designed bathroom connects to a vent pipe. This vent runs up through the roof and allows air into the drain system so water flows freely. Without venting, you get slow drains and that unpleasant gurgling sound. The rough-in diagram shows where the vent stack connects.
Rough-In Measurements
These are the distances marked on the diagram. They tell you how far each pipe or stub-out is from a wall, the floor, or the center of another fixture. These numbers are what you need to match when buying fixtures.
Standard Rough-In Measurements for Every Bathroom Fixture
This is the section most people come looking for. Here are the standard rough-in measurements used across the US. Keep in mind that older homes sometimes have non-standard measurements, so always measure your existing setup before assuming.
| Fixture | Measurement | Standard Dimension |
|---|---|---|
| Toilet | Drain center to finished wall | 12 inches (10″ or 14″ in older homes) |
| Toilet | Supply line height from floor | 6–8 inches |
| Toilet | Supply line from drain center | 6 inches to the left |
| Bathroom Sink | Drain from finished floor | 16–20 inches |
| Bathroom Sink | Hot supply height | 20–22 inches from floor |
| Bathroom Sink | Cold supply height | 20–22 inches from floor |
| Shower | Drain from wall (centered) | Varies by shower size |
| Shower | Faucet valve height from floor | 38–45 inches |
| Showerhead | Height from floor | 72–78 inches |
| Bathtub | Drain location | Per manufacturer spec |
| Bathtub | Overflow height | 15–17 inches from tub floor |
These numbers give you a solid starting point. However, always cross-reference with your specific fixture’s installation instructions. Manufacturers sometimes have slightly different requirements.
How to Measure Your Existing Toilet Rough-In
The toilet rough-in is the measurement that confuses people most. Here is how to measure it correctly in an existing bathroom.
Find the center of the toilet drain. If the toilet is already installed, look at the bolts that hold the toilet to the floor. These sit on either side of the drain. Measure from the finished wall behind the toilet to the center point between those bolts.
In most US homes built after 1960, that number will be exactly 12 inches. That is the standard rough-in. Older homes, particularly those built before the 1950s, sometimes have a 10-inch or 14-inch rough-in instead.
This matters because toilets are manufactured for specific rough-in distances. A toilet designed for a 12-inch rough-in will not seat properly against the wall if your actual rough-in is 10 inches. It will either stick out too far from the wall or not reach the flange at all.
A real example: A homeowner in Chicago renovates their 1940s bathroom and assumes a standard 12-inch rough-in. They buy a new toilet, but the actual rough-in turns out to be 10 inches. The toilet now sits awkwardly away from the wall. They have to return it and order a 10-inch rough-in model, losing two weeks on the project.
Always measure first. Always.
Reading a Rough-In Diagram: Step by Step
If you have a rough-in diagram in front of you and are not sure how to read it, follow these steps.
Step 1: Identify the fixture locations
Look for labeled symbols. A circle usually represents a toilet drain. A rectangular outline represents a tub or shower base. A smaller oval or circle marks a sink drain.
Step 2: Find the reference points
Measurements on a rough-in diagram always start from somewhere. That somewhere is usually the finished wall surface or the centerline of the drain. Look for dimension lines with arrows pointing to these reference points.
Step 3: Read the dimensions
Note every measurement carefully. Write them down. These numbers tell you exactly where pipes need to land in your rough framing.
Step 4: Check for elevation dimensions
Not all measurements are on the floor plan. Some diagrams include elevation views that show the height of supply lines and drainpipes off the finished floor. Make sure you check both the floor plan view and any elevation drawings included.
Step 5: Compare against your fixture specs
Pull up the installation manual for every fixture you plan to use. Compare the rough-in requirements in that manual against what the diagram shows. If they do not match, solve that problem before a single pipe is installed.
Common Mistakes to Avoid
Assuming all rough-ins are standard
They are not. Always measure your existing plumbing before assuming it matches modern standards.
Forgetting about the finished floor
Rough-in measurements are typically taken from the finished floor, not the subfloor. If you are adding tile, that adds thickness. Account for it.
Ignoring vent requirements
Some DIYers focus only on supply and drain lines and forget about venting. A bathroom without proper venting will have slow drains and sewer gas problems.
Not checking local codes
Plumbing codes vary by state and even by city. Always verify your rough-in plan against local building codes before starting work. Your local building department can help with this.
Skipping the permit
Rough-in plumbing work typically requires a permit in the US. Skipping it creates problems when you sell the home and puts your safety at risk.
Conclusion
Getting your bathroom plumbing rough-in diagram right is not glamorous work. It does not show up in the finished photos. But it is the work that determines whether everything else goes smoothly or turns into an expensive headache.
Take time to read the diagram carefully, measure your existing plumbing, compare against your fixture specs, and check your local codes. Do this before anything is ordered or installed, and you will save yourself real time and real money.
If you are unsure at any point, a licensed plumber can review your rough-in plan for a small fee. That investment almost always pays for itself by catching one problem before it becomes five.
If you found this guide helpful, take a look at our related articles on shower drain installation and how to plan a bathroom layout from scratch. Both will give you the next layer of detail you need for a successful project.
Frequently Asked Questions
What is a standard toilet rough-in measurement?
In the US, the standard toilet rough-in is 12 inches from the finished wall to the center of the drain. Older homes may have 10-inch or 14-inch rough-ins.
Can I change my toilet rough-in distance?
Yes, but it usually means moving the drain pipe and opening the floor. In most cases, it is easier and cheaper to buy a toilet that fits your existing rough-in.
What is the difference between rough-in plumbing and finish plumbing?
Rough-in plumbing is the pipework installed before walls and floors are finished. Finish plumbing is when fixtures like toilets, sinks, and faucets are installed and connected.
Do I need a permit for rough-in plumbing work?
Usually, yes. Most US areas require a permit and inspection for rough-in plumbing to make sure the work meets code.
How do I know if my rough-in measurements are correct?
Compare your measurements with the fixture manufacturer’s installation guide. If you are unsure, have a licensed plumber check the layout before work starts.