

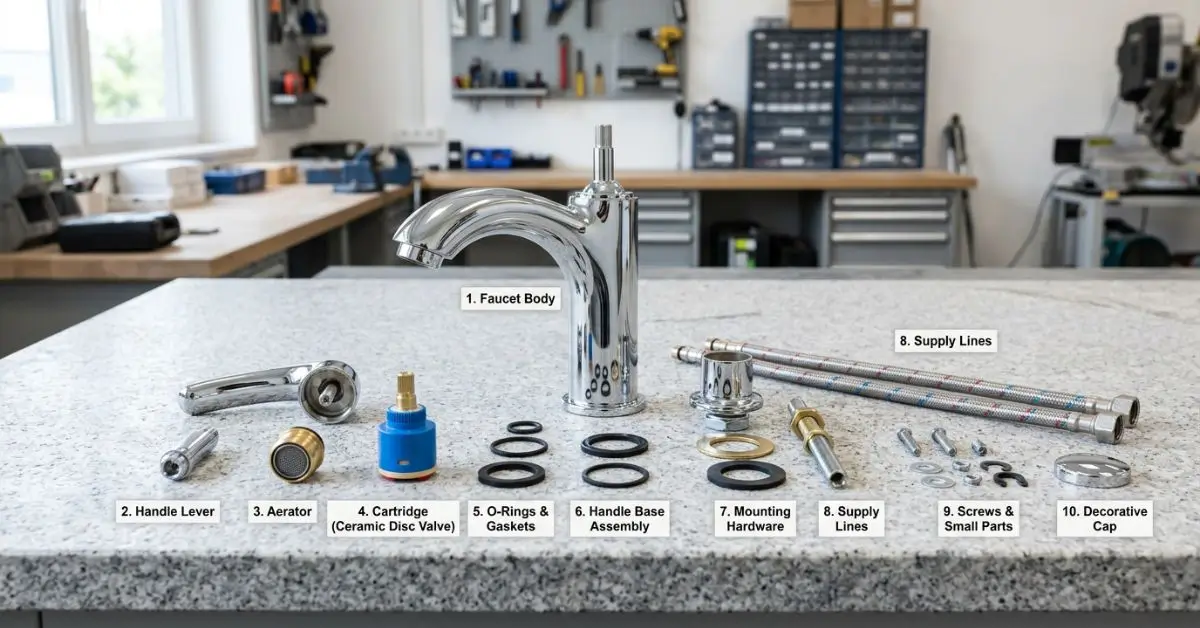
Bathroom Faucet Parts
A dripping faucet. A handle that turns without stopping the flow. A faucet that spits water unevenly or trickles when it should run strong. These problems are common, they are fixable, and they almost always come down to a single worn-out component.
The challenge for most homeowners is that they do not know what that component is called, which means they cannot look it up, cannot order the right part, and cannot describe the problem accurately to a plumber. The result is either an expensive service call for a simple repair or a hardware store trip that ends in confusion.
This guide names every major bathroom faucet part, explains what it does, describes what it looks like when it fails, and tells you whether replacing it is a DIY job or one worth calling a professional for.
Bathroom faucet parts are the individual components that make up a complete faucet assembly, covering both the external elements you can see and the internal mechanisms that control water. Each part serves a specific function in regulating flow, temperature, or pressure. When a part fails, it produces identifiable symptoms. Knowing which part caused which symptom is the fastest path to an accurate, cost-effective repair.
Quick Summary
Every bathroom faucet contains a set of standard components. The most commonly replaced are cartridges, O-rings, valve seats, washers, and aerators. You can identify which part needs attention by matching your symptom to the part responsible for it. This guide covers every major component, what it does, and how to recognize when it has failed.
Why Knowing Your Faucet Parts Matters
A faucet dripping once per second wastes more than 3,000 gallons of water per year according to EPA data. That is both an environmental and financial drain that most homeowners delay addressing simply because they do not know where to start.
Beyond water waste, a small problem that goes unaddressed typically becomes a bigger one. A worn O-ring causes a slow drip that eventually becomes a leak. A failing cartridge causes a leak that damages the cabinet underneath the sink over time. Early identification of which part has failed keeps small repairs from becoming expensive renovation projects.
Understanding your faucet components also helps when you need to communicate with a plumber. A homeowner who can say the cartridge in my single-handle Moen faucet is failing saves the plumber time and typically saves money on the service call.
Faucet Types and Why They Matter for Parts
Before covering individual components, understanding the four main faucet types is important because the internal parts vary significantly between them.
Cartridge faucets use a replaceable cartridge that slides up and down to control flow and rotates to control temperature. These are the most common type in modern US bathrooms and are relatively straightforward to repair.
Ball faucets have a single handle that rotates over a dome-shaped ball cap. Inside, a rotating ball with holes aligns with inlet ports to control flow and temperature. The internal components include the ball, springs, seats, and O-rings.
Ceramic disc faucets use two ceramic discs that slide past each other to control flow. They are among the most durable faucet types and require less frequent repair, though the discs do occasionally need cleaning or replacement.
Compression faucets are the oldest design, using a rubber washer pressed against a seat to stop water. They are common in older homes and require regular washer replacement as the rubber wears with use.
Knowing which type you have before shopping for parts prevents the most common and frustrating repair mistake: buying a replacement part that does not fit your faucet.
Every Major Bathroom Faucet Part Explained
The Handle
The handle is the most visible part of any faucet. It translates your hand movement into mechanical action inside the faucet body. Single-handle faucets control both flow and temperature through one handle. Double-handle faucets use separate handles for hot and cold.
Handles rarely fail structurally but do become loose over time. A handle that spins freely without stopping water flow indicates a stripped connection between the handle and the stem beneath it, not a problem with the water-controlling mechanism itself.
The Decorative Cap and Handle Screw
On most bathroom faucets, a small decorative cap sits on top of the handle, concealing the set screw underneath. Removing this cap to access the screw is the first step in any handle removal, and it is a detail that confuses many first-time DIY repairers.
Prying the cap off gently with a flathead screwdriver reveals the screw. Removing the screw allows the handle to lift free, giving access to the internal components.
The Packing Nut
Located just beneath the handle, the packing nut secures the stem or cartridge within the faucet body. When this nut loosens, water can seep up around the base of the handle.
Tightening a loose packing nut with an adjustable wrench often stops this type of leak without requiring any part replacement. It is the first thing worth checking when water appears around the handle rather than dripping from the spout.
The Cartridge
The cartridge is the central working component in cartridge-type faucets. It is a self-contained unit that moves to control water volume and temperature. When a cartridge fails, the most common symptoms are a constant drip from the spout, a handle that moves stiffly or offers no resistance, or the inability to get hot water and cold water to mix correctly.
Cartridges are brand and model specific. A Moen 1225 cartridge will not fit a Delta faucet or a Kohler. Before purchasing a replacement, note the faucet brand, locate the model number on the base or in the original documentation, and confirm the correct cartridge part number on the manufacturer’s website.
Replacing a cartridge is one of the most common and manageable DIY faucet repairs. The process typically takes twenty to thirty minutes and requires shutting off the water supply, removing the handle, extracting the old cartridge, and pressing in the new one.
O-Rings
O-rings are small rubber rings that wrap around stems and cartridges at connection points to create watertight seals. They degrade with heat, mineral exposure, and time. When an O-ring fails, the most recognizable symptom is water leaking around the outside of the faucet, at the base of the spout or around the handle, rather than dripping from the spout tip.
This distinction matters because it tells you where the problem is. A drip from the tip points to the internal valve mechanism. Leakage from the outside of the faucet body points to O-ring failure.
O-rings typically cost less than a dollar each and are available in standard sizes at any hardware store. Replacing them is among the simplest faucet repairs available.
The Valve Seat
The valve seat is the point within the faucet body where the internal valve mechanism makes contact to stop water flow. In compression faucets, the rubber washer presses against this seat to seal the water. Over time, mineral deposits accumulate on the valve seat surface, creating an uneven contact area that prevents the washer from sealing properly.
A pitted or corroded valve seat is one of the most common causes of a persistently dripping compression faucet even after the washer has been replaced. Resurfacing the seat with a seat-grinding tool corrects this. If the damage is too severe, the entire faucet body may need replacement.
The Stem and Rubber Washer
In compression faucets, the stem screws into the faucet body and has a rubber washer at its base. Turning the handle screws the stem down, pressing the washer against the seat and stopping flow. This is why compression faucets require more turning effort than modern cartridge designs.
The rubber washer is the most frequently replaced part in any compression faucet. When the washer wears, the faucet drips from the spout tip every time the handle is closed. Replacement costs under a dollar and takes about fifteen minutes once you have removed the handle and stem.
Ball, Springs, and Seats (Ball Faucets)
Ball-type faucets have a rotating ball inside the faucet body with small holes that align with inlet ports to control water flow and temperature. Beneath the ball, small springs press rubber seats against the ball to create a seal.
When springs weaken or rubber seats wear, the faucet drips from the spout. Ball faucet repair kits are available from most manufacturers and include all the internal parts needed for a complete overhaul: the ball itself, springs, seats, and O-rings. Replacing everything at once when the faucet is already apart prevents having to repeat the repair in a few months.
Ceramic Discs
In ceramic disc faucets, two discs, one stationary and one that rotates with the handle, control water by aligning or blocking openings as they slide past each other. Ceramic is extremely hard and durable, but mineral deposits from hard water can accumulate on disc surfaces and interfere with the seal.
Before assuming a ceramic disc faucet needs new parts, clean the discs thoroughly with white vinegar and a soft cloth. Mineral buildup rather than physical wear causes most ceramic disc faucet problems. If a disc is cracked or chipped, replacement is necessary. Replacement discs are available as complete cartridge assemblies from most manufacturers.
The Aerator
The aerator is the small screen assembly threaded onto the tip of the faucet spout. It mixes air into the water stream, creating a smooth, even flow and reducing splash. Over time, sediment and mineral deposits clog the aerator, reducing water pressure and creating an uneven spray pattern.
When you notice reduced pressure or inconsistent spray from a single faucet, the aerator is the first thing to check. Unscrew it by hand or with pliers wrapped in a cloth to protect the finish. Soak it in white vinegar for thirty minutes and rinse. This restores normal flow in most cases. Replacement aerators cost $5 to $15 and install in minutes.
Supply Lines
Supply lines are the flexible hoses connecting the shut-off valves under the sink to the faucet inlets. They carry separate hot and cold water to the faucet body. Braided stainless steel supply lines are more durable than rubber and less prone to failure over time.
Supply lines rarely fail under normal conditions but should be replaced when a faucet is changed, when any corrosion is visible at the connection points, or if you notice moisture under the sink that cannot be attributed to another source.
Shut-Off Valves
Located on the water supply pipes under the sink, shut-off valves stop water flow to the faucet for repairs without requiring you to shut off the main water supply to the home. Quarter-turn ball valves are the most reliable and easiest to operate. Older compression-type shut-off valves can develop leaks over time and should be replaced with ball valves if they fail to close fully or if they drip.
Knowing where your shut-off valves are before any repair emergency is one of the most practical pieces of plumbing preparedness available to a homeowner.
Symptom-to-Part Quick Reference
| Symptom | Most Likely Cause | DIY or Pro? |
|---|---|---|
| Drip from spout when faucet is off | Worn cartridge, washer, or valve seat | DIY |
| Leak around handle base | Failed O-ring | DIY |
| Leak around spout base | Failed O-ring | DIY |
| Handle spins freely | Stripped stem connection | DIY |
| Stiff or hard-to-turn handle | Worn cartridge or mineral buildup | DIY |
| Low pressure from one faucet | Clogged aerator | DIY |
| Uneven spray or splash | Clogged aerator | DIY |
| No temperature control | Failed cartridge or ball | DIY |
| Water pooling under sink | Supply line or shut-off valve leak | Pro if valve fails |
When to Replace Parts Versus the Whole Faucet
Replacing individual parts makes financial sense when the faucet is less than fifteen years old, when the faucet body is in good condition, and when replacement parts are available for your specific model.
Replacing the entire faucet is the better decision when multiple parts are failing at the same time, when the faucet body itself is corroded or cracked, when parts are no longer available because the model has been discontinued, or when the cost of repair approaches the cost of a new faucet.
A homeowner with a ten-year-old single-handle faucet whose cartridge has worn out should almost always replace just the cartridge. The same homeowner with a thirty-year-old faucet showing corrosion on the body and a worn cartridge is better off replacing the whole unit.
Conclusion
Every bathroom faucet problem connects back to a specific part. When you know what each part does and what its failure looks like, a dripping faucet stops being a mystery and becomes a straightforward repair task.
Start with the symptom. Use the quick reference table to identify the most likely cause. Confirm your faucet type and brand before ordering a replacement part. And tackle the repair with the confidence that comes from understanding what you are dealing with before you start.
If this guide helped you prepare for a faucet repair, take a look at our related articles on how to replace a bathroom faucet cartridge step by step and choosing the right bathroom faucet for your home. Both give you the practical next steps for completing your repair or upgrading to a faucet that will serve you better long-term.
Frequently Asked Questions
What are the main parts of a bathroom faucet?
The key parts are the handle, cartridge or valve stem, O-rings, valve seat, aerator, supply lines, and shut-off valves. Internal parts vary by faucet type, whether cartridge, ball, ceramic disc, or compression.
How do I know which part needs replacing?
Match the symptom to the part. A spout drip points to the cartridge or valve seat. Leaking around the faucet body suggests O-ring failure. Weak or uneven flow usually means a clogged aerator.
Are faucet parts interchangeable between brands?
Internal parts like cartridges are brand and model specific. Always confirm your faucet brand before buying. Aerators are more standardized and often fit across different brands using the same thread size.
How much does a cartridge replacement cost?
Cartridges typically cost $15 to $50. Plumber labor adds $75 to $150 per hour, making cartridge replacement one of the better DIY repair options for most homeowners.
How often should aerators be cleaned?
Every six to twelve months in most homes. In hard water areas, every three to four months. Always check the aerator first when pressure drops or the spray becomes uneven.